Search This Blog

Sunday, September 27, 2015

Preparing Old Wine Bottles for Upcycling

I have been collecting old wine and liquor bottles since we moved into this apartment. On occasion so bring them home from work, the rest are from cooking and personal consumption here at home. Since hubby gathered them all together and they filled a whole box, I figured I better use them.
My first project will be a set of small organizers for a small metal rack in my bedroom. The wire shelves make using some containers here troublesome, so I figure heave glass containers will be the perfect solution for holding combs, brushes, and other small items that always seem to get lost and tossed around. Plus it has to look better than the old shoe box I am using now.


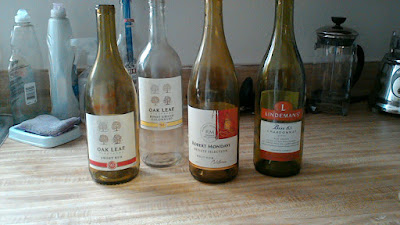
The first step is to clean the bottles and remove the labels. I hit up Pinterest as usual and came across a very useful pin that compared label removal methods. To spare you the trouble of looking it up, soaking the bottles and a mixture of very hot water and baking soda works best. Since not all ornate bottles were clean, I decided to combine the cleaning and label removing steps and added dish soap to the soak water. It seems that the cheaper the wine, the harder it is therefore the label. Ok, there's nothing scientific in that, just observational. Also clear bottles seem to be a bit harder to work with - perhaps a stronger adhesive?


Here are my results from the first four bottles that I soaked. While I got all of the labels off, I am left with a bit of glue to clean up. Still, this is better than hours of peeling and scraping. To remove the left over residue, and even some left over sticker scraps from the second set I did (not pictured) I turned to canola oil. Just wipe a good layer over the affected areas and allow it to sit for a n hour or two. The oil beaks down the adhesive enough to be easily wiped or lightly scraped from the bottle. Then just wash away the oil with dish soap.


Here are the final results, all ready to be cut and decorated. I can't wait to get to the next step!
Friday, August 7, 2015

DIY Waste Basket from Upcycled Magazines (Redone)

Once upon a time while searching for craft ideas on the internet, I happened upon a site featuring recycled paper crafts. One young lady made sturdy and attractive baskets from old magazine pages. The idea stuck in my head, and when I found I needed a new bedside waste basket I knew what to do. While apartment hunting, we had picked up loads of visitors booklets and catalogs and luckily I knew where my glue sticks and hot glue supplies were. I even had an appropriately small box lid. I got to work rolling paper "logs" with the glue stick, and then fastening them to the lid using my hot glue gun. I loved the finished product and it served me well for 2 years. Then it got smashed. I decided it was time for an upgrade.

I regret to say that I have lost the original link for instructions on making the logs, but I have found another that covers it: Magazine Vase and Pencil Holder. The only difference is that I used glue sticks instead of Mod Podge.

Weaving the "logs" together

I spent a while testing it apart and picking off old bits of hot glue. Once I had the bare components of box lid and paper "logs," I got to work. Using 24 gauge wire, I wove the logs together in sort of a random basket weave. I could have been a bit neater, but I was aiming for strength. Since I had ripped some of the logs I had already decided that aesthetics were no longer an immediate priority.
I wove the wire at the bottom and center of the logs to create a long panel. Next, I returned to the original design by hot gluing the panel to the lid. I then added glue between the logs. The finished product is much stronger, (and a little lopsided - oops) so goal achieved. Now to decide how to decorate it...

My lopsided basket. I wove a little too tightly. I think if I make it look like twigs, the lopsidedness of it will look natural.

Friday, July 24, 2015

Cleaning Sand Dollars

This week, one of the servers in the restaurant I work for was given some sand dollars by a customer (along with a tip). He knows that I love to make stuff, so passed them to me to see what I could do with them. If you have ever picked up sand dollars on the beach before, you know that they aren't clean by any standard. In fact, they aren't even slightly white. These were brown, and a little fuzzy for lack of a better term.

Filthy sand dollars before soaking.


To get that creamy white color they must be cleaned first by a fresh water soak. I soaked mine for over 24 hours. This is largely because it was already 6 pm and the sun was required to finish the task. In the end, this was a good thing because most of the debris fell off in the last 6 hours. I also was careful to change the water a few times... it can get smelly!

Just added to bleach. See how much cleaner they look already.


Follow the soak with a ten minute bleach bath followed by a good rinse.

Out of the bleach and into the sun.

The final step is a sun bleaching session. This should help with any yellowing. I did not have yellowing after the bleach, but a few grey and pink spots remained. The sun cleared these right up in two hours. Please keep in mind that the times I used here worked for these sand dollars. Dirtier ones may need more, and cleaner less. Use your best judgement.

Finished product.


In the end, I was left with 4 beautiful sand dollars ready for crafting for the price of a splash of bleach... total win.


Wednesday, July 15, 2015

Chicago Style Deep Dish Pizza

My husband and I met in the Chicago suburbs. I had lived in the region for my entire life, and my husband is from a military family, so after years of moving around the world, they settled there when he was in high school. Needless to say, the local treats of the area were a regular part of our daily lives. So now that we have been away for about four years, we are experiencing withdrawal symptoms. It is basically impossible to find Chicago style deep dish pizza in the pan handle of Florida. Dominos is fine for a quick fix, but we needed the real deal. It was time to get to work.

The pan seemed like it was going to be the biggest hurdle. I believed incorrectly that I would need an overpriced specialty pan. Then as luck would have it, while searching through dough recipes, I found that spring form cake pans were perfect for the task. I was also pinched  for time, so while I made the dough from scratch, I let the bread machine do the hard part. The recipe I used is found here on Food.com. Once the bread machine had finished its work and the rising part had completed, we simply shaped it into the pan. I cheated and used a rolling pin to get the process started, but finished by gently pulling the dough to the correct shape as often recommended.

This done, we began layering in our ingredients. This included a pound of mozzarella, onions, green bell pepper, mushrooms, and mini pepperoni slices. Stop this we added our sauce. We like ours chunky and so added a can of red pepper spiced diced tomatoes to the store bought marinara. I finished this off with fresh basil from my window ledge garden. The final topping was a sprinkle of Parmesan cheese.

After about 40 minutes we had ourselves a pretty good dinner. As this was an experiment, there are a few changes to be made next time. We may add ground beef. Also, I will perform the veggies a bit. I also really need to practice with dough. All in all though, this was good. Furthermore, it ended up not costing a lot since it easily made 6 individual meals. I'm definitely keeping this on our menu.

It got a little lopsided, but that's my lack of skill with dough showing.

Wednesday, June 17, 2015

Meals in 20 - Roast Beef Sandwich with Au Jus

Cooking is a major hobby for me. I can't think of many things more rewarding than watching the look of joy pass across the face of someone who has just tasted one of my creations. That being said, lengthy, complex meals are not always possible. Several days ago, Dear Hubby and I spent a good deal of time running errands ending in a grocery store trip. By that time we were exhausted and starving. We could have ordered take out, but the truth is we had a craving for Italian Beef sandwiches, and living in the panhandlers of Florida, they are impossible to find. When we were in Chicago, there were countless restaurants that served or one could find tubs of the stuff in nearly any store. The correct way to make it requires hours that we were unable to wait through. Then Hubby came up with a plan.

We started with good roast beef from the deli. You know the kind, perfectly pink in the middle, not sliced until you order it. We had them slice a pound and a half on the second thinnest setting. We also picked up beef broth, mushrooms, and hoagie rolls. In retrospect, a fresh clove of garlic and fresh oregano would have been good too.

This is the "doneness" we wanted. It cooks more in the au jus. 
To assemble the sandwich, we wanted the broth adding Italian seasoning, garlic pepper, and a beef bullion cube to boost the beefy goodness. This also eliminated the need to add salt. Next we added the mushrooms to flavor them and warm them. Lastly, we added the roast beef to give it more flavor and warm it. When everything was hot, it time to begin building. Slit open the rolls, and add the beef being sure to get a little of the au jus to soften the bread. Then add  the mushrooms and enough mozzarella (or whatever cheese makes you happy) and close top the sandwich. The hot meat should melt the cheese. Dish up a little of the au jus for dipping the sandwich, and chow down.

I only use Kräft cheeses. They are largely lactose free meaning they are the only choice for me. 


This is one of my favorite meal hacks because it can be personalized in so many ways and it is so quick. Not too expensive either - the roast beef was the most pricey bit. Of course we have leftovers which is always my goal. It was a great meal for a lazy night. Can't ask for much more.

Friday, June 12, 2015

Shoeless no more

In my normal boring life, I work in a restaurant, mostly in the kitchen area. As you may expect, there are frequently spills and slippery debris on the floors that can lead to painful slips and falls. For that reason, we are require to seal slip resistant shoes. In that past two and a half years I have been through four pairs of shoes. I need a new pair, but money is tight right now, so when the sole of my current pair blew out, I decided the get a little more life out of them by combining two pair of shoes to make use of the best part of both.

Using a heat gun to remove the soles.
All removed

My current shoes are men's oxfords. I love almost everything about them. They're tasteful and not overly masculine. They have the cheapest soles though. I started noticing that my feet kept getting wet and when I investigated, the bottoms had given up the fight. The pair I owned previously didn't fit my look at all, and had begun losing the stitching in the uppers. Also the soles were separating from the uppers, which is what gave me the idea.


How I created the sizes needed.


I used duct tape to hold the new soles to the shoes. Gorilla glue does not bond instantly.


Using a heat gun, I removed the soles from the ugly pair and trimmed away the edging. My current shoes have heels, so I cut the soles to fit the heel and main base of my oxfords, and pulled out the Gorilla Glue. It is important to note that Gorilla Glue expands so use it sparingly. I forgot that fact, so when the glue was dry, I had glue to trim from the edges. I cut it away with my pocket knife. Because the shape of the two shoes were so different, it does look a bit like I am floating, but that's a little fun. Point is, 2 days in,and no one has noticed, and I have dry feet. Total win in my book.

Thursday, June 11, 2015

DIY Cat Scratcher? Why not?

While perusing kitten toys, I noticed those cardboard cat scratch boards. I thought to myself, "That's brilliant." That thought was cut short however because my eyes fell to the price on the shelf. Ten dollars for the equivalent of a shoe box lid filled with strips of corrugated cardboard tightly arranged within. I figured this could easily be made for free, and set about proving that theory.

The first step, as I saw it, was finding a containing box. I had a few smaller Amazon boxes around, and so I cut one down to be about 2 1/2 inches tall. For the filler, I cut the flaps from a portable freezer shipping box. It is quite thick and sturdy, and so it seemed perfect. I then cut the flaps into strips matching the height of the box. The strips are folded into accordions to fill the entire container as tightly as possible. This is where things get tricky if you don't have a straight edge, as I found out on my first attempt. The layers are uneven, and that just seems unfinished. Also, it is too small. The test kitten liked it, but only for small stretches as she got frustrated that she couldn't sit on it and scratch at the same time.

So, because all I really did wrong was to take was to be lazy with the project was to think too small and make shortcuts, I was able adapt my same idea. I used a ruler to make the goods in the strips even and used much larger containing bow. It was the lid from a cardboard storage tote. I decided to add a bit of glue in between the slats to keep things neat. Since my test kitten loves it, I plan to dress it up by covering it in fabric, but for now, this is one perfectly serviceable, nearly free cat scratcher.


Meet Willow, the test kitten.


She likes to lounge and scratch here. I feel rewarded.

Thursday, May 14, 2015

Updates...

When I last posted I told you all of a number of free items that I sent away for. So far I have received 3 of them. The first to arrive were my wallpaper samples from Wallpapers Direct. The colors weren't exactly what I expected, but that's what I get for choosing colors from a computer monitor. The last item that arrived was the fabric samples. I should have noted the size as they are tiny, but I can still work with them. I wanted varying shapes and sizes, and that is what I have. Bemz shipped them from Lithuania, so the shipping time was pretty amazing and I can't wait to get the whole project together.


The second item to arrive was the lettuce seed from Groundswell International. I have been quite preoccupied with life lately, and so only got them planted today. I am looking forward to having fresh free lettuce in my home, and am already looking for the next plant to get started.


I also had a great surprise this week when the ginger I started from a store-bought root started to sprout. I've already begun looking for new Asian inspired recipes to use it in. One great dish that I have already tried is Crock Pot Mongolian Beef. I tweak this recipe by decreasing the amount of brown sugar and adding crushed red pepper. It's so easy and tasty that this will make appearance on our table regularly.

My ginger... isn't it cute?

Wednesday, April 29, 2015

FREE!!! My favorite word.


One of my favorite things is finding free things that are actually useful. The usefulness of the item is actually the most important part of the deal, as we all know that it is an easy thing to find free things that nobody wants. Today I'll share some of my more recent finds. Perhaps they may spark some new ideas for you.

Wallpaper and fabric samples
I have a completely bare wall above the couch in my living room. I hang stuff there for Christmas, but the rest of the year it's just a full, unused space. It has been this way for the two years we have lived here because I couldn't come up with anything that seemed to fit the space. Yesterday I had an epiphany and began looking for free wallpaper samples on line.

Wallpaperdirect.com allows 2 free samples (shipping included), no questions asked.

Bemz, a company that specializes in Ikea furniture updates allows fabric samples that ship overseas at not cost. The plan is to use the wallpaper and fabric in frames to fill in the space. (Now just to find free frames!) I will be sure to update this project once it is all in place.

Gardening
As you know if you have read previous posts, I have begun trying to supplement our grocery supplies by growing a few things at home. I already have cilantro and basil growing well from seeds that I purchased on the cheap. I also have green onions and ginger growing from store purchases. It is a good start, but I want more. After searching, I found several sources for free seeds.

Groundswell International was the most impressive source that I found. They have a goal, it seems, to feed the world. Therefore, every spring they give away thousands if not millions of seeds to promote ending world hunger. Definitely worth checking out even if you don't have a green thumb.

Gardens Alive will send you a free catalogue, and that contains a $25 coupon with no minimum purchase. I haven't received the catalogue yet, so I can't promise there is no fine print, but other testimonials I have read point to it being true to its words. The exciting thing here is that they offer equipment and other gardening supplies.

Feed a Bee has a lofty goal in mind. They want go grow 50 million flowers to help out dwindling new population. To that end they will send packets of 200 wildflower seeds for free. No, it's not food for us, but we rely on bees for a majority of our food. In my book, this type of gardening is even more important than any of my plant endeavors.

This isn't the end of my quest for freebies, but it is a great start. If you have any good sources, please share them in the comments. I, of course, will report on the outcome of everything I tried here today. A little searching can pay off in a big way!

Thursday, April 9, 2015

Money crunch!

This week I bought an almost new car. It is only a year old, has very few miles, and has all the fuel saving perks a frugal girl could want. While I got a great price given my credit situation (thank you recession), it still is a lot more money than I spend on things. Of course after the purchase, I panicked about money. So today, I am looking for ways to save even more money around the house. I already use dish soap, baking soda, and vinegar to do most of my cleaning (especially the floors) and shop sales for commercial cleaning products. I buy the store brand or equivalently priced item for nearly everything else. I also take advantage of various store perks and programs such as Wal-Mart Savings Catcher and grocery store member cards but still think I can do more.

Another step I have taken is to start an indoor herb and scrap garden. It's been slow going since I have been quite busy lately, but I have basil and cilantro going strong. I started them from those small $1 kid's growing sets. The containers are recycled tea cans. I also have onions, both green and yellow, growing from what was purchased from food we bought. Apparently this can be done with a number of produce items. I have some ginger that will find itself in a pot before the weekend is over as well. The most expensive part of this venture was the potting soil (yes Mom, Miracle Grow). Recycled containers help, but even the ones I purchased were only $1 from Wal-Mart.

This is a beginning, but by no means the end of this quest. Feel free to comment below on some of your container gardening adventures, and I'll keep you updated on my progress.


My herbs and green onions. 


Hard to see, but a small yellow onion plant is popping up here.


Tuesday, April 7, 2015

Reuse, reduce...

Because money is harder to come by than ideas, I have decided to use the latter to make the most of what I have or can get for very little cost. That is fortunate, because I have a desire to lessen my carbon footprint and I love to make things. Finding unique solutions to everyday issues comes naturally to me. My bedside wastebasket is made of old magazines and hot glue. I based it on an idea I found here. It has lasted a year, and a little less trash went to the dumpster that day. I save jars for storage of small items, etc. and use soft drink caps to elevate my dish drain to help with water flow. I know this makes me sound a bit like a hoarder, but trust me - many things do end up trashed. The key is to keep a few items (jars, empty water jugs) on hand, then toss the rest until some have been used. So now that I have shared a few ideas, it's your turn. Please share some of the unique ways you reuse items in your homes. I will continue to share ideas I find with you... complete with instructions and photos.
Theses  jars were re-purposed for avocado plants. Nothing happened, but I tried!