Search This Blog

Showing posts with label reuse. Show all posts

Tuesday, January 16, 2018

Jewelry: Sorted

I love jewelry. I don't have a lot of it, but that's changing. I own a beautiful silver-toned jewel box, but it doesn't hold everything. This means my baubles make a mess of my nightstand or get tangled in a bag.  I decided that it would be nice to create a nice display organizer to go over my night stand. This would be my second attempt at a solution actually. The last one was a minor disaster and an even bigger eyesore. I didn't even bother to photograph it. This is better. Just better.

I started with two old store bought pictures that I didn't have a place for in my house. The frames on them were gorgeous, and I came to realize that's why I still had them. They had sage colored mats however, and that did not fit the plan. In fact, that just made the mats look dingy. Black acrylic paint solved this problem nicely. I used a dry brush and applied the paint sparingly and the result gave it a woody, natural looking texture. Next,  I prepared the cardboard backing from the original picture by covering it in craft foam sheets in black. I just used my hot glue gun for this because I  was feeling impatient and didn’t want to wait for white glue to dry. Also using hot glue, I covered the padded side of the board with a fat corner of black fabric. This all got reassembled (minus the picture) into the frame. This was easy for this frame because I didn’t have to remove any of the staples that secure everything in place.

This is the cardboard backing covered in foam. I had just enough!

To actually have somewhere to place the jewelry, I turned to wine corks. I have a collection of these as well. I chose the cheap artificial ones for this because I have more of these and because of their uniformity. For post earrings I cut the corks in half and wrapped them with silver-toned wire strung with purple glass seed beads. I attached them using screws and hot glue. Run the screw through the back of the board to the front the screw the cork about halfway onto the screw. Add a drop of hot glue, then finish attaching the cork. Add a drop of ho glue over the head of the screw for extra security. The earrings just slip into the cork, and I only keep the backs in the jewelry box.

For bracelets and rings, I used whole corks with divots carved into the sides. I decorated these with more wire, and a silver mother of pearl at each end of the cork. I attached these one at either end of the inner mat using the previous technique. The rings are placed on bamboo sticks that lay in the grooves. For the bracelets I glued several sticks together for strength. The rings and bracelets get placed between the corks and nothing slides off.

I love this so far. Another part that I love is that I can add to it. As you can see, I began using it before adding a second row of earrings and the bracelets. I have the other frame to use for necklaces, but I haven't decided on a design there yet. There are quite a few of chains, beads, and ribbons, and some are quite long, so I want to get it right. At any rate, I hope this design inspires you to create something good looking and useful out of your odds and ends. Please feel free to drop me a comment below, and be sure to check back every so often. I have a few other projects in the works that I can't wait to finish and share with you. Some even involve antiques!

Tuesday, October 3, 2017

A Simple Fabric Covered Box

Hello again crafty budgeters. I had a free evening and a small annoyance to tackle recently and so I stopped procrastinating and got to work. Hubby and I sit daily on our full-sized couch. Its soft and comfy and gives us way to much space too plop things down on the cushion in the center. Seriously, remotes, cell phones, notebooks, mice and keyboards, etc. It gets to the point where we start knocking things off and blaming each other for pushing in back and forth. My solution comes in the form of a small cardboard box, two fat quarters, Elmer's glue, and and some foam padding.


This little box was the perfect size for my needs. Just big enough to contain the junk that made simply sitting down a chore. I colored the outside of the box black to avoid its previously white and black print to show through. Frozen juice concentrate is not the look I was aiming for after all. I then cut a piece of the black fabric large enough to cover the entirety of the outside of the box, as well as the inside upright edges. I affixed it to the box with a thin coat of Elmer's white glue as though I were wrapping a gift and adding more glue to the flaps. The patterned fabric was used to cover the foam pad I added to the bottom. This was done to reduce the noise and potential damage of things being tossed in carelessly (yes, referring to myself).
  

That last application of glue necessitated the extra inserts seen above. I simply sized two thin pieces of card stock from junk mail and glued a bit of the patterned fabric neatly to them. I glued them over the messy flaps. So much better.


Here's everything all neatly assembled. Since I literally bought nothing for this project I cannot accurately give an idea of the costs. I often pick up fabric remnants and fat corners on clearance, and I had these on hand already. I've also been known to re-purpose other sources of material from sheets, old clothes, etc. so get creative. Let me know what you think of this quickie craft in the comments below.

Also, I need a wall-mountable jewelry storage solution. Any ideas?

Monday, May 16, 2016

Flower Pots for Next to Nothing pt. 2


If you’ve been keeping up with my admittedly sporadic posts, you know that I have been working on killing the overgrowth in my garden by smothering it with potted plants. My first experiment with Folgers containers are holding up well, so I used them as the base for this new design.


I started by removing the label, then measuring bamboo skewers to fit into the straight parts of the container. It has bulges at the top and bottom, and I wanted to glue the skewers flush with the sides. I cut the skewers down to size using old wire snips from my jewelry making tools. I attached them as shown using hot glue.


I'm afraid I waited a bit long to transplant these last begonias. Most of the blooms have gone. Still...


The bulges in the can I covered using jewelry making cord. I attached this with hot glue too. Once cooled, I flipped the whole thing over and stabbed a few drainage holes in the bottom. The finished project turned out even better than the first design in my opinion. What do you think?

Tuesday, May 10, 2016

Flower Pots for Next to Nothing pt. 1


When I moved into my apartment a few years ago, I was thrilled to have a tiny garden area I could play with. Small doesn’t really even begin describe the space, but its mine. Problem is, that being strapped for money, I couldn’t afford to buy much for the space. My neighbor worked as a landscaper at the time and was able to get me canna lilies, some sort of bamboo, some purple flower that grows on long vines that look like twigs (don’t know the name) and umbrella grass. I love his initiative, but these are all plants that grow wildly out of control. Rather than digging all of this up, I have come up with the idea of limiting them by covering them with potted flowers instead. Pots cost money though, and there just isn’t much (well any) to spare.

I started looking through my collected odd and ends and realized I had a few usable containers around the house. The one I started with was a small plastic Folgers Coffee can. Its bright red and obviously and old Folgers container so that needed changing. I remembered a post where a woman covered her whole floor in paper bags. It looked a bit like leather when it was done, and I liked that idea. I pulled out my trusty Mod Podge, a paint brush, a small paper bag and got to work. I ripped the paper bags into smallish pieces and applied them to the container making sure to overlap each of the pieces and the top and bottoms of the containers. Then I coated the entire outside in another layer of Mod Podge to weatherproof it. I like how it turned out, despite the fact that the red shows through. I paired the two I made in this style with red begonias (under $2 for a flat of 6 at Walmart). They look cute in the garden.


The first coffee can planter all finished and filled.
The terra cotta planter I already had made a good home too.


I haven’t come up with a plan for the next few planters. I have a few large coffee cans, plenty of glass bottles, and a few plastic bottles and jugs to work with. Any suggestions? Please leave them in the comments below.

Tuesday, April 19, 2016

Another Cat Toy Done on the Cheap

Willow (previously known as Test Kitten, T.K. for short) has grown, and so have her needs. She gained size, but lost none of her energy, and so needs more cat safe activities to keep her out of trouble. When I noticed how excited she got over some pool noodles that hubby and I bought (to be featured in  another project), I figured that would be the perfect building block for Willow's new scratchy-batty-chew toy.

Early test to see if she's even interested. She is!


The base was the side of a drawer from my soon to be replaced (fingers crossed) wardrobe. We stabilized it using small sections of pool noodle cut in half length-wise secured with duct tape . The longer vertical section of noodle was secured with my trusty Gorilla Glue.The fuzzy ladybug toy was from a package of assorted toys. She played with it maybe 3 times since getting it, and it had a dangle to tie it to something, so I did. I poked a length of ribbon through the top of the noodle and knotted it at a length to facilitate maximum swinging. 

Shortly after this pic, the toy was attacked from above.
I covered the base using some scrap fabric I had laying around. I figured she would think the duct tape was the real novelty and so this cover seemed like a good idea. It looks better too. Although this doesn't get as much love as some other toys, she still loves to beat this mercilessly. Another win on the cheap.

After many attacks a few weeks later. As you can see, it stands up to the Willow test.


Sunday, September 27, 2015

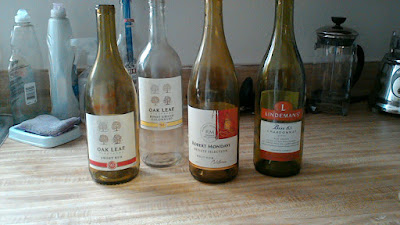
Preparing Old Wine Bottles for Upcycling

I have been collecting old wine and liquor bottles since we moved into this apartment. On occasion so bring them home from work, the rest are from cooking and personal consumption here at home. Since hubby gathered them all together and they filled a whole box, I figured I better use them.
My first project will be a set of small organizers for a small metal rack in my bedroom. The wire shelves make using some containers here troublesome, so I figure heave glass containers will be the perfect solution for holding combs, brushes, and other small items that always seem to get lost and tossed around. Plus it has to look better than the old shoe box I am using now.


The first step is to clean the bottles and remove the labels. I hit up Pinterest as usual and came across a very useful pin that compared label removal methods. To spare you the trouble of looking it up, soaking the bottles and a mixture of very hot water and baking soda works best. Since not all ornate bottles were clean, I decided to combine the cleaning and label removing steps and added dish soap to the soak water. It seems that the cheaper the wine, the harder it is therefore the label. Ok, there's nothing scientific in that, just observational. Also clear bottles seem to be a bit harder to work with - perhaps a stronger adhesive?


Here are my results from the first four bottles that I soaked. While I got all of the labels off, I am left with a bit of glue to clean up. Still, this is better than hours of peeling and scraping. To remove the left over residue, and even some left over sticker scraps from the second set I did (not pictured) I turned to canola oil. Just wipe a good layer over the affected areas and allow it to sit for a n hour or two. The oil beaks down the adhesive enough to be easily wiped or lightly scraped from the bottle. Then just wash away the oil with dish soap.


Here are the final results, all ready to be cut and decorated. I can't wait to get to the next step!

Thursday, June 11, 2015

DIY Cat Scratcher? Why not?

While perusing kitten toys, I noticed those cardboard cat scratch boards. I thought to myself, "That's brilliant." That thought was cut short however because my eyes fell to the price on the shelf. Ten dollars for the equivalent of a shoe box lid filled with strips of corrugated cardboard tightly arranged within. I figured this could easily be made for free, and set about proving that theory.

The first step, as I saw it, was finding a containing box. I had a few smaller Amazon boxes around, and so I cut one down to be about 2 1/2 inches tall. For the filler, I cut the flaps from a portable freezer shipping box. It is quite thick and sturdy, and so it seemed perfect. I then cut the flaps into strips matching the height of the box. The strips are folded into accordions to fill the entire container as tightly as possible. This is where things get tricky if you don't have a straight edge, as I found out on my first attempt. The layers are uneven, and that just seems unfinished. Also, it is too small. The test kitten liked it, but only for small stretches as she got frustrated that she couldn't sit on it and scratch at the same time.

So, because all I really did wrong was to take was to be lazy with the project was to think too small and make shortcuts, I was able adapt my same idea. I used a ruler to make the goods in the strips even and used much larger containing bow. It was the lid from a cardboard storage tote. I decided to add a bit of glue in between the slats to keep things neat. Since my test kitten loves it, I plan to dress it up by covering it in fabric, but for now, this is one perfectly serviceable, nearly free cat scratcher.


Meet Willow, the test kitten.


She likes to lounge and scratch here. I feel rewarded.

Thursday, April 9, 2015

Money crunch!

This week I bought an almost new car. It is only a year old, has very few miles, and has all the fuel saving perks a frugal girl could want. While I got a great price given my credit situation (thank you recession), it still is a lot more money than I spend on things. Of course after the purchase, I panicked about money. So today, I am looking for ways to save even more money around the house. I already use dish soap, baking soda, and vinegar to do most of my cleaning (especially the floors) and shop sales for commercial cleaning products. I buy the store brand or equivalently priced item for nearly everything else. I also take advantage of various store perks and programs such as Wal-Mart Savings Catcher and grocery store member cards but still think I can do more.

Another step I have taken is to start an indoor herb and scrap garden. It's been slow going since I have been quite busy lately, but I have basil and cilantro going strong. I started them from those small $1 kid's growing sets. The containers are recycled tea cans. I also have onions, both green and yellow, growing from what was purchased from food we bought. Apparently this can be done with a number of produce items. I have some ginger that will find itself in a pot before the weekend is over as well. The most expensive part of this venture was the potting soil (yes Mom, Miracle Grow). Recycled containers help, but even the ones I purchased were only $1 from Wal-Mart.

This is a beginning, but by no means the end of this quest. Feel free to comment below on some of your container gardening adventures, and I'll keep you updated on my progress.


My herbs and green onions. 


Hard to see, but a small yellow onion plant is popping up here.


Tuesday, April 7, 2015

Reuse, reduce...

Because money is harder to come by than ideas, I have decided to use the latter to make the most of what I have or can get for very little cost. That is fortunate, because I have a desire to lessen my carbon footprint and I love to make things. Finding unique solutions to everyday issues comes naturally to me. My bedside wastebasket is made of old magazines and hot glue. I based it on an idea I found here. It has lasted a year, and a little less trash went to the dumpster that day. I save jars for storage of small items, etc. and use soft drink caps to elevate my dish drain to help with water flow. I know this makes me sound a bit like a hoarder, but trust me - many things do end up trashed. The key is to keep a few items (jars, empty water jugs) on hand, then toss the rest until some have been used. So now that I have shared a few ideas, it's your turn. Please share some of the unique ways you reuse items in your homes. I will continue to share ideas I find with you... complete with instructions and photos.
Theses  jars were re-purposed for avocado plants. Nothing happened, but I tried!