Search This Blog

Showing posts with label upcycle. Show all posts

Friday, September 22, 2017

Where I Get Ideas to Try

Hello fellow budgeters! I've been away for quite awhile, I know. Things have been a special kind of crazy in my life ranging from no car (resolved) to training for a new position at work. Family changes have been a constant too, so I haven't had the time to tackle many household annoyances or try many crafts.

Now that I'm getting used to my new schedule and family obligations I have decided that it is time to reclaim my thrifty creativeness. While I do have many original ideas born of necessity, I often base ideas on things, posts, videos, and tutorials I see both in real life and online. I thought I would share some of these ideas with you to help get your creative juices flowing.


This is routinely my first stop. Other people have scoured the internet looking for solutions to problems, and have kindly placed links to them all in one easy to find place. I mostly use this for recipes, but I'd be lying if I said that was all. I find that unless you have ample time to scroll through the likely millions of posts available,  searching Pinterest by keyword is the way to go. I also find that sorting posts that I save helps to find them when I need them. I've even begun a board just for this blog to highlight the projects I've done here.


I love YouTube. There are so many instructive videos that one can literally sit in front of it for hours and not even begin to scratch the surface of what is available. Jewelry design, life hacks, sewing tutorials, beauty DIYs, and technology how to's are just a few of the things I resort to YouTube for. Its not all fail and haul videos.


I have looked at Hometalk a few times in the past, but recently I have taken a closer look, and I am impressed! My countertops and cabinets were replaced a few months ago, and Hubby and I decided we wanted a backsplash. While we have put those plans on hold for a while, I found many ideas suitable for an apartment right on Hometalk. This is a great source for home décor and hack ideas.

Craft store sites (Michaels, Fire Mountain Gems, JoAnn's)

Retail sites have gone out of their way to ensure that you purchase what they're selling. One good side effect is that many craft supply sites will have free tutorials and patterns using the items that they sell. There are way too many to list here, but give it a try. You may be surprised. Don't forget to try product manufacturers too, such as Lion Brand Yarn, etc.


I hope this has been helpful. If so, please let me know in the comments. I love sharing gems like these, and would love to hear about any good sites you may have found. This is a topic I would love to revisit a bit more, and of course, find great new ideas!

Monday, May 16, 2016

Flower Pots for Next to Nothing pt. 2


If you’ve been keeping up with my admittedly sporadic posts, you know that I have been working on killing the overgrowth in my garden by smothering it with potted plants. My first experiment with Folgers containers are holding up well, so I used them as the base for this new design.


I started by removing the label, then measuring bamboo skewers to fit into the straight parts of the container. It has bulges at the top and bottom, and I wanted to glue the skewers flush with the sides. I cut the skewers down to size using old wire snips from my jewelry making tools. I attached them as shown using hot glue.


I'm afraid I waited a bit long to transplant these last begonias. Most of the blooms have gone. Still...


The bulges in the can I covered using jewelry making cord. I attached this with hot glue too. Once cooled, I flipped the whole thing over and stabbed a few drainage holes in the bottom. The finished project turned out even better than the first design in my opinion. What do you think?

Tuesday, April 19, 2016

Another Cat Toy Done on the Cheap

Willow (previously known as Test Kitten, T.K. for short) has grown, and so have her needs. She gained size, but lost none of her energy, and so needs more cat safe activities to keep her out of trouble. When I noticed how excited she got over some pool noodles that hubby and I bought (to be featured in  another project), I figured that would be the perfect building block for Willow's new scratchy-batty-chew toy.

Early test to see if she's even interested. She is!


The base was the side of a drawer from my soon to be replaced (fingers crossed) wardrobe. We stabilized it using small sections of pool noodle cut in half length-wise secured with duct tape . The longer vertical section of noodle was secured with my trusty Gorilla Glue.The fuzzy ladybug toy was from a package of assorted toys. She played with it maybe 3 times since getting it, and it had a dangle to tie it to something, so I did. I poked a length of ribbon through the top of the noodle and knotted it at a length to facilitate maximum swinging. 

Shortly after this pic, the toy was attacked from above.
I covered the base using some scrap fabric I had laying around. I figured she would think the duct tape was the real novelty and so this cover seemed like a good idea. It looks better too. Although this doesn't get as much love as some other toys, she still loves to beat this mercilessly. Another win on the cheap.

After many attacks a few weeks later. As you can see, it stands up to the Willow test.


Sunday, September 27, 2015

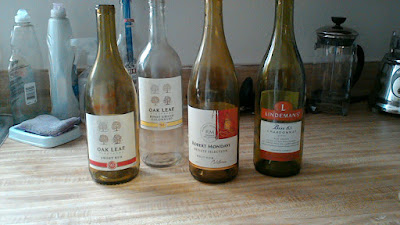
Preparing Old Wine Bottles for Upcycling

I have been collecting old wine and liquor bottles since we moved into this apartment. On occasion so bring them home from work, the rest are from cooking and personal consumption here at home. Since hubby gathered them all together and they filled a whole box, I figured I better use them.
My first project will be a set of small organizers for a small metal rack in my bedroom. The wire shelves make using some containers here troublesome, so I figure heave glass containers will be the perfect solution for holding combs, brushes, and other small items that always seem to get lost and tossed around. Plus it has to look better than the old shoe box I am using now.


The first step is to clean the bottles and remove the labels. I hit up Pinterest as usual and came across a very useful pin that compared label removal methods. To spare you the trouble of looking it up, soaking the bottles and a mixture of very hot water and baking soda works best. Since not all ornate bottles were clean, I decided to combine the cleaning and label removing steps and added dish soap to the soak water. It seems that the cheaper the wine, the harder it is therefore the label. Ok, there's nothing scientific in that, just observational. Also clear bottles seem to be a bit harder to work with - perhaps a stronger adhesive?


Here are my results from the first four bottles that I soaked. While I got all of the labels off, I am left with a bit of glue to clean up. Still, this is better than hours of peeling and scraping. To remove the left over residue, and even some left over sticker scraps from the second set I did (not pictured) I turned to canola oil. Just wipe a good layer over the affected areas and allow it to sit for a n hour or two. The oil beaks down the adhesive enough to be easily wiped or lightly scraped from the bottle. Then just wash away the oil with dish soap.


Here are the final results, all ready to be cut and decorated. I can't wait to get to the next step!

Friday, August 7, 2015

DIY Waste Basket from Upcycled Magazines (Redone)

Once upon a time while searching for craft ideas on the internet, I happened upon a site featuring recycled paper crafts. One young lady made sturdy and attractive baskets from old magazine pages. The idea stuck in my head, and when I found I needed a new bedside waste basket I knew what to do. While apartment hunting, we had picked up loads of visitors booklets and catalogs and luckily I knew where my glue sticks and hot glue supplies were. I even had an appropriately small box lid. I got to work rolling paper "logs" with the glue stick, and then fastening them to the lid using my hot glue gun. I loved the finished product and it served me well for 2 years. Then it got smashed. I decided it was time for an upgrade.

I regret to say that I have lost the original link for instructions on making the logs, but I have found another that covers it: Magazine Vase and Pencil Holder. The only difference is that I used glue sticks instead of Mod Podge.

Weaving the "logs" together

I spent a while testing it apart and picking off old bits of hot glue. Once I had the bare components of box lid and paper "logs," I got to work. Using 24 gauge wire, I wove the logs together in sort of a random basket weave. I could have been a bit neater, but I was aiming for strength. Since I had ripped some of the logs I had already decided that aesthetics were no longer an immediate priority.
I wove the wire at the bottom and center of the logs to create a long panel. Next, I returned to the original design by hot gluing the panel to the lid. I then added glue between the logs. The finished product is much stronger, (and a little lopsided - oops) so goal achieved. Now to decide how to decorate it...

My lopsided basket. I wove a little too tightly. I think if I make it look like twigs, the lopsidedness of it will look natural.